Adobe Creative Cloud is an essential resource for many of us to complete our jobs. Yes, the applications and their ability to talk to each other is convenient. They are powerful. And we’ve come to rely on them heavily. Which is why we get even more frustrated when Photoshop slows, hands, or crashes. When Illustrator won’t launch. When InDesign refuses to update.
What’s a Creative Cloud user to do? Give up?
Not so fast. Before you throw in the towel, here are some basic ways to fight back against Adobe application issues. Let’s take a look:
Your Connection and Your Creative Cloud Account
These days, most individuals subscribe to an Adobe Creative Cloud membership to keep all of their Adobe software up to date. Because Adobe frequently releases new updates for its entire suite of applications, it’s especially important that you keep your software versions current to avoid interruptions (and angry outbursts!).
The most common issues with Adobe applications can be managed by:
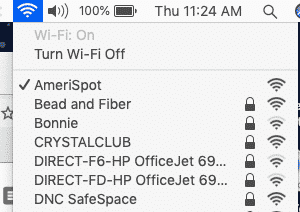
1. Checking your internet connection
2. Confirming you’re signed into Adobe Creative Cloud (click the infinity icon and then click your circular account icon to check).

If you’re not logged, in, log in. If that doesn’t fix your issue, continue on for more specific troubleshooting tips.
Troubleshooting Adobe Application Launches
When you’re trying to open Photoshop or another Creative Cloud application, does the application close without an error message?
- If yes, try resetting your Creative Cloud information by logging out of Adobe Creative Cloud and then logging back in (see the above screenshot from step #2 to find your account icon).
Are you seeing a spinning wheel and error message when opening Photoshop or another Creative Cloud application?

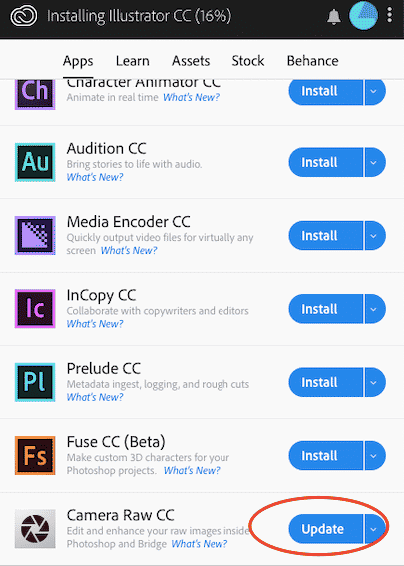
- Try updating your Creative Cloud application (such as Photoshop). Check the list of Creative Cloud applications and notice if any say “Update.” If so, update your application(s).
- Relaunch Adobe Creative Cloud by clicking the blue “here” link in the window with the spinning wheel. This will reset any background processes that are having problems running.
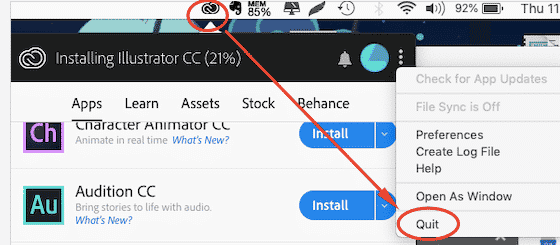
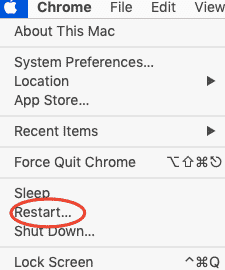
- Quit Creative Cloud altogether, restart your computer, then relaunch Creative Cloud (most systems automatically relaunch Creative Cloud after restarting).
- Uninstall and then reinstall the entire Creative Cloud application.
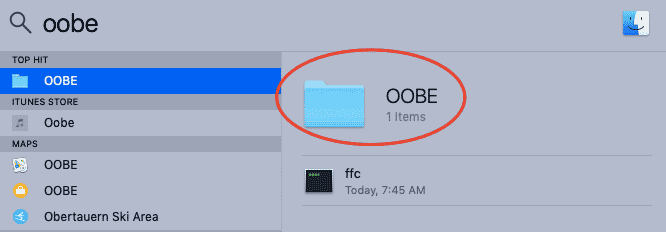
- Delete the files in the “OOBE” folder. Quit Creative Cloud.
- On a Mac, hit Cmd + space to launch Spotlight, and type in “OOBE”. Double-click on the folder, and delete the files you find there.
- Relaunch Creative Cloud.
Photoshop-Specific Application Troubleshooting
Photoshop, in particular, will hog your computer’s memory. It requires a lot of RAM. So, Photoshop is one of the most frequently troubling applications to someone who’s trying to complete a specific design task (or many — after all, we’re constantly multi-tasking nowadays, aren’t we?)
Update Adobe Photoshop
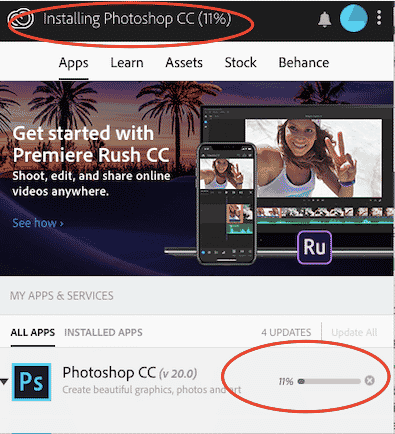
As mentioned above, the first step to take is to make sure Photoshop is updated. Open Creative Cloud and scroll down to Photoshop. If there’s a blue button that says, “Update,” do it.
Click the button and you’ll see progress updates in two locations: at the top of the CC window, and next to the Photoshop application itself.
Once the update is complete, relaunch Photoshop and see if you notice a difference in performance.
Clean Up Your Hard Drive
Because Photoshop uses a lot of RAM and hogs so much space on your hard drive, make sure you’ve got enough room. If you don’t, your computer will start to act sluggish, and Photoshop performance will seriously decline.
Take a look at what’s stored on your computer, and delete as many unnecessary files as you can. Mac users can purchase applications like CleanMyMac or Dr. Cleaner to help sort out large files, duplicate files and irrelevant files. You can also use a flash drive or online file storage service such as Dropbox to store files you’re not using on a regular basis.
Photoshop’s Memory Preferences
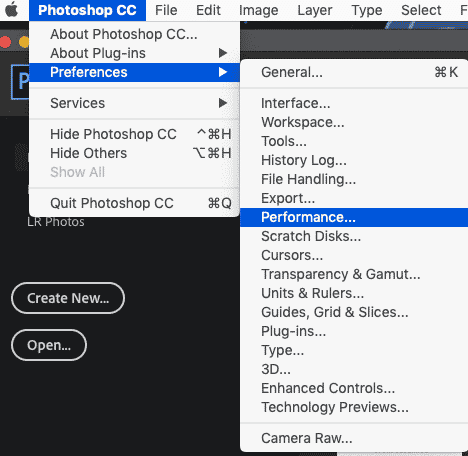
Troubleshoot Photoshop’s memory usage. Go to Photoshop CC → Preferences → Performance.
Grab the slider under the Memory Usage bar and try moving it further to the right to increase the amount of memory you allow Photoshop to use.
Ideally, you’d be able to allow Photoshop to use 100% of the available memory, but many of us have multiple Adobe Creative Cloud applications running at the same time, and those applications will need some juice, too.
Troubleshooting Photoshop’s Cache and History Settings
Another pair of settings that can cause hanging problems in Adobe Photoshop is History and Cache. The more steps in your history that Photoshop keeps track of, the more memory Photoshop will need (note that reducing the steps in your available history will also reduce the number of available “Undo” actions (Cmd + Z or Ctrl + Z).
Staying in the Performance Settings dialog (see above), try reducing the number in the “History” dropdown. You can also play around with adjusting the number after “Cache” — if you’re working with large images, try increasing the number and if you’re working with smaller images or lots of layers, try reducing the number. Note any increasing in Photoshop’s performance.
Check Photoshop’s Efficiency
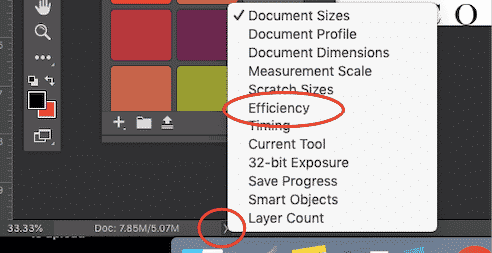
If you’d like to check your current efficiency, go to the bottom of the Photoshop window and click on the right arrow to pop up your selections. Choose “Efficiency.”
You’ll then see the display in the bottom of the window change to show your current percentage of Efficiency.
The closer to 100% you are, the better Photoshop’s performance will be on your computer. The further away from 100% you are, the more you’ll be using scratch disks (taking up free space on your hard drive), which slows down your performance.
Speaking of Scratch Disks…
Scratch disks in Photoshop are necessary when you don’t have enough RAM to process the size of an image. If your computer can’t find five times the amount of storage as the size of the file you’re trying to work on, you’ll experience problems in the form of error messages. You may need to look into external hard drive options or upgrade your computer as soon as you’re able.
Instantly Free Up RAM
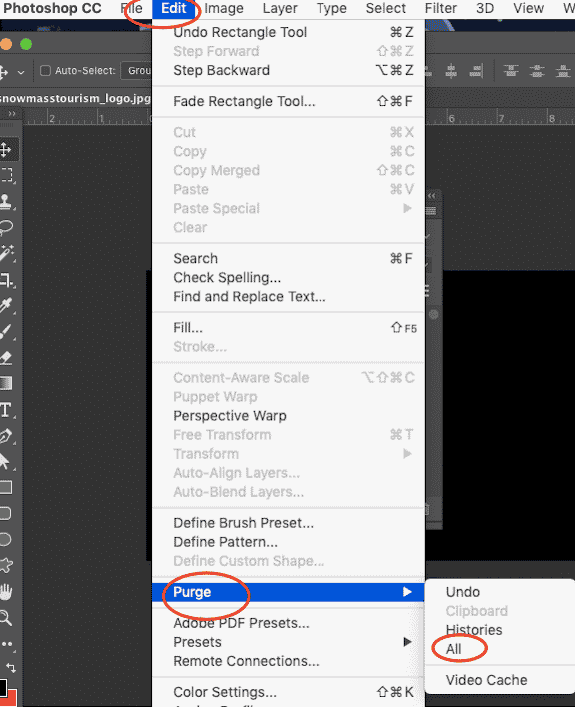
Another way to troubleshoot Photoshop’s speed and function are to increase the amount of available memory that Photoshop can use. Photoshop is continually storing data as you use it, recording your clipboard data and history. If you’re experiencing issues in Photoshop, you can instantly free up RAM by purging the stored data. Go to the Edit menu and choose Purge → All.
Fonts Affecting Performance in Photoshop
Turning off Font Preview is another quick way of troubleshooting performance issues in Adobe Photoshop. Especially with so many free fonts available online (and who can resist downloading and installing them all?), trying to render previews for them all can create a large burden for Photoshop.
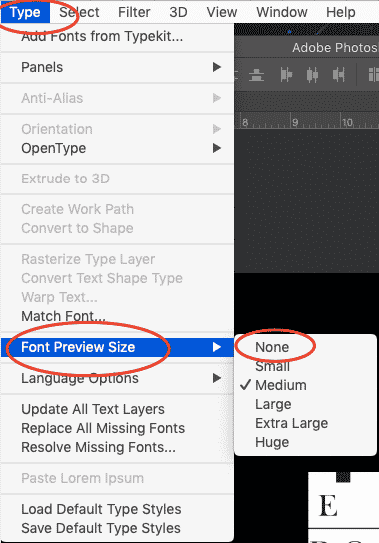
When Photoshop works hard, you’ll be working slower. So do yourself (and Photoshop) a favor, and turn off all font previews by going to Type → Font Preview Size → None.
Reset Your Tools
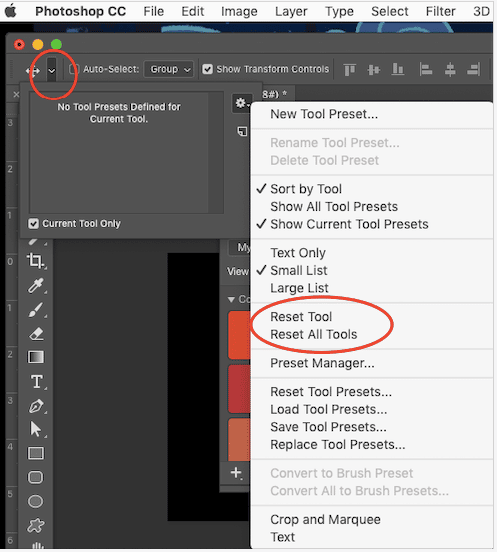
Sometimes you’ll notice odd behavior when trying to use a specific Photoshop tool. You can reset that specific tool, or reset them all to cover all bases by default. Right-click (on a PC) or Control-click (on a Mac) the little down arrow (Tool Preset Picker) in the Tool Options bar at the top of the Photoshop window. Then choose whichever you prefer: reset one or reset all!
Keep Going
By using the troubleshooting tips above, you should be able to significantly reduce the amount of frustration you experience with Creative Cloud (and especially that glitchy Photoshop). Give them a try and notice how much less frequently you’re pounding your fists in exasperation.
Above all, don’t give up!
Need help with your print? Talk to a live print expert today: 800-930-7978.
