Output Preview is a convenient Adobe Acrobat tool which helps you visually troubleshoot your PDF files before they go to print.
Output Preview will display content selectively, based on whatever options you choose through the Output Preview dialog. Visual troubleshooting can be a quick and efficient way to identify the biggest potential problems in the way of a perfect print job. You could also generalize and call Output Preview the best way to “soft proof” a document — to see an approximation of what it will look like once actually printed.
What issues can Output Preview help you identify on the spot? Identifying RGB images, spot colors, and overprinting are just a few areas where this tool excels.
And what won’t Overprint Preview identify? Things that aren’t apparent at a glance, such as issues with document size, resolution of images, and file or font embedding problems. You can dig a little deeper in the dialog box, especially with the Object Inspector (which we’ll cover below), but it’s a way for you to do your own super-sleuthing as opposed to having error boxes pop up and highlight where you might want to start looking.
Look at it like a self-directed investigation, versus red flag chasing.
Exploring the Output Preview Dialog
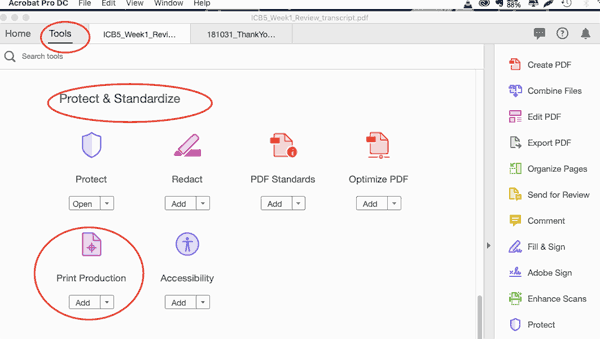
Open the Output Preview dialog in Adobe Acrobat Pro in order to view all available visual preview options. To get there, click on the “Tools” tab, then scroll down to “Protect & Standardize,” then finally click on “Print Production.”
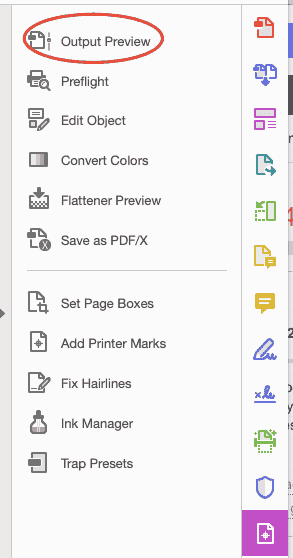
In the right-hand pane, click “Output Preview.” (Note: Because this is a visual preview, you’ll be responsible for noticing any oddities or errors, and digging deeper as necessary.)
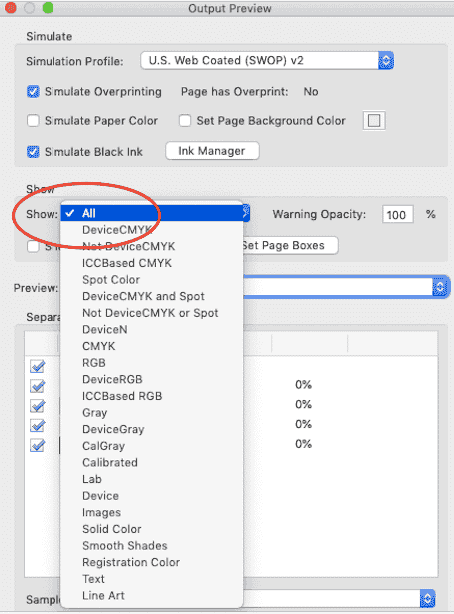
By making various selections from the “Show” dropdown, you’ll be able to choose what (if it exists in the document) will display on your screen.
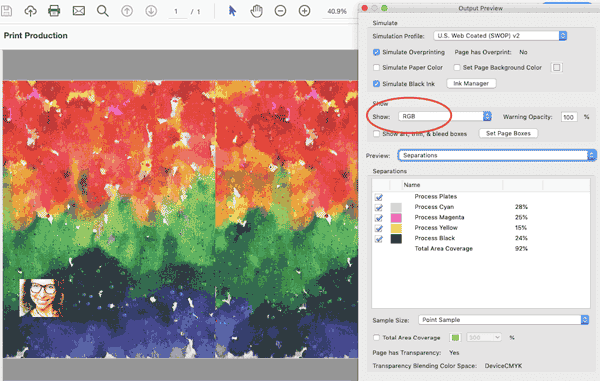
For example, by choosing “RGB” from the “Show” dropdown menu, we see that three images in the document are in RGB color space and will need to be converted to CMYK for printing.
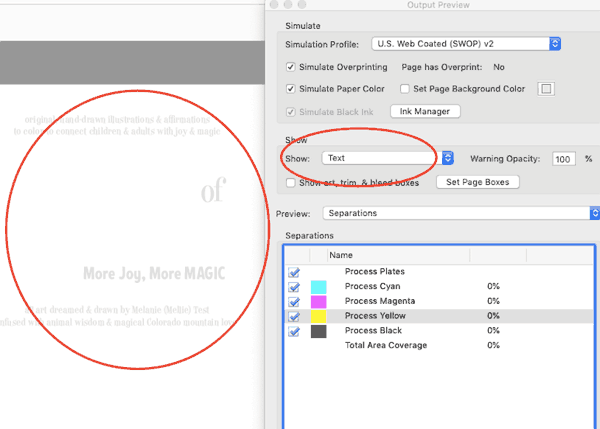
By selecting “Text” in the “Show” dropdown, you’ll see only the text throughout the document. (The text in this example only looks faded because it’s white text in the final piece.)
Color Separations with Overprint Preview
Acrobat can also help you preview color separations from within Overprint Preview. To get there, choose “Separations” from the “Preview” dropdown menu in the center of the dialog box. (image: separations.png).
You will then see all of the inks required in order to print the currently open PDF. For most documents, you’ll usually see the four basic process plates (which are called “separations”): cyan, yellow, magenta, and black.
You can play around a bit in this dialog by checking and unchecking the boxes next to each color; each time you check or uncheck a box, you’ll be given a visual preview of what the document would look like if that color were either removed or included. You can keep the process color plates checked and click anywhere on your document to see what percentage of each process color will be printed in that spot.
You can also uncheck all the boxes for cyan, magenta, yellow, and black to show only imagery in your document which uses spot colors.
Correcting Spot Colors in Adobe Acrobat Pro
Speaking of spot colors, Adobe Acrobat Pro offers convenience in this area. You can actually correct spot colors right from inside Adobe Acrobat instead of having to go back, reopen, and edit within your original application! Print Production Tools Ink Manager to the rescue!
The Ink Manager can map one spot color to another. Here’s how: take a look at the list of incorrect spot colors (or correct spot colors if you’ve simply changed your mind and want to re-map). Select one, and then while it’s selected, choose the correct spot color from the Ink Alias list at the bottom of the dialog box. All of the objects which use the first spot color will then automatically be re-mapped to output in the right color (or new color, if you’re making an arbitrary change) on the right plate.
Soft Proofing with Simulation Profiles
The Simulation Profiles in Adobe Acrobat Pro’s Overprint Preview can help you ”soft proof” your document for a variety of scenarios. It give you an idea of what your document would look like when printed on different types of paper stock (including colored papers), or even on a different colored background.
As you change the Simulation Profiles in Output Preview, you’ll notice color shifts in your document on the screen. Adobe Acrobat is using the display on your screen to approximate what your printed document will look like.
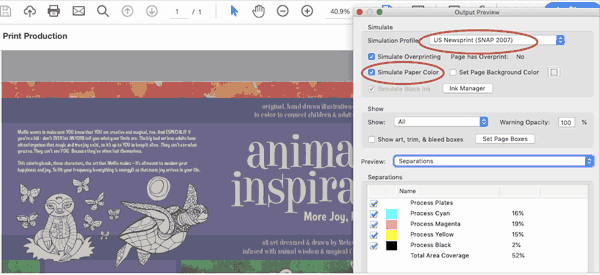
For example, you can see how muted this colorful print piece would be if printed on newsprint instead of white paper stock by choosing the “US Newsprint (SNAP)” Simulation Profile, then checking the box for “Simulate Paper Color.”
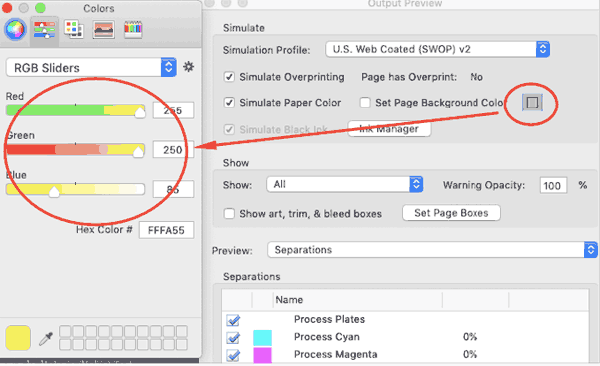
You could also see what would happen if you printed your piece on yellow paper or cardstock by clicking the colored box to the left of “Set Page Background Color”, then using the RGB sliders to choose your desired color.
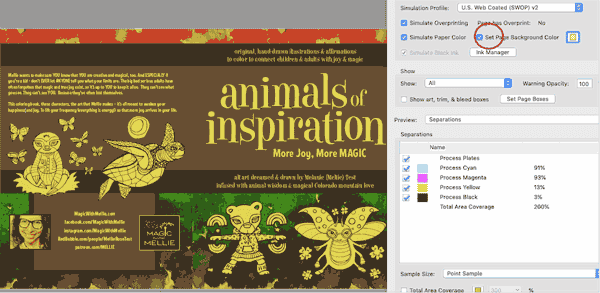
Then, when you’ve chosen your background color, you can check the box to the left of “Set Page Background Color” to see what the output result would be. Here’s what this piece would look like if printed on yellow stock:
While it could be fun to play endlessly with different combinations of printers, papers, and background colors, the point is to choose the output device that matches what your printer will actually be using. Not sure? Just ask your printer what their specifications are, and what profiles they’ll be using.
Note that in order for the Simulation Profile to accurately display your monitor must have been calibrated, and you must have accurately calibrated ICC profiles. Without calibrating both your monitor and the ICC profiles, the simulation can’t accurately match the printed PDF.
Exploring Acrobat’s Output Preview Object Inspector
The Object Inspector, just like Separations Preview, is part of Overprint Preview. The Object Inspector will display everything that’s true about the content in the location you click on your PDF document. The Object Inspector provides details on everything from color space to image resolution to fonts, and more.
You can access the Object Inspector from Overprint Preview. Choose the “Preview” dropdown and then select “Object Inspector.”
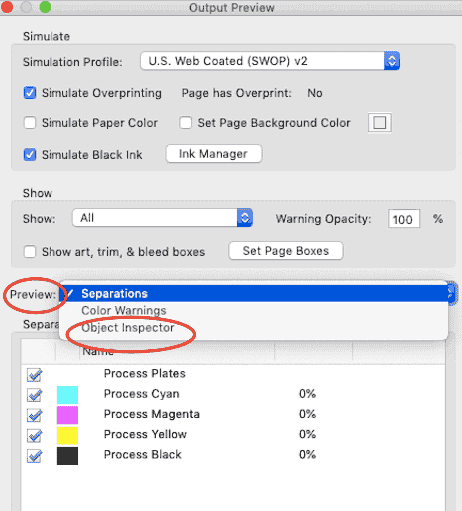
Don’t be frightened by the empty Object Inspector window. By default, Acrobat’s Object Inspector won’t have any details to display until you manually select something on the page. You’re given crosshairs, so you’ll hover over your document and click on the object you’d like to inspect. Once you do, you’ll see the window populate with a list of information.
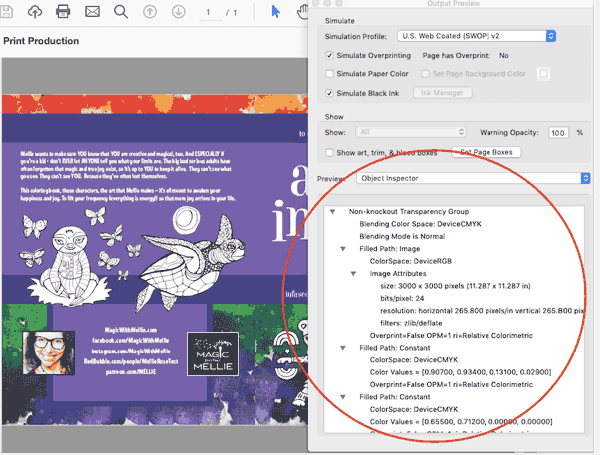
This list documents everything that’s happening underneath wherever you clicked; it’s like taking a spot sample of all the layers that exist (or slicing a layer cake. Yum). You may see information about the color space, blending mode and live transparency, size and resolution of an image, font details, and overprint information.
How is this helpful and how can you avoid overwhelm? Let’s say you print your document and an image comes out pixelated. By using the Object Inspector in Overprint Preview, you can visually select what printed incorrectly, and find out why. Perhaps it was a resolution issue, or had to do with live transparency? Using this tool is a great way to troubleshoot — and manage your own expectations (or those of a picky client) before your file gets in your printer’s hands.
Want help printing your next project? Printing for Less’s print consultants will help you get your ideas into stunning print. We’re here 8am-5pm MT Monday through Friday at (800) 930-7978.
