InTime: Play that Funky Master Page
Let’s start simply with an introductory groove. Nothing too hard core, just enough to start your feet tapping. Let’s lay down some overrides. Everyone knows how important master pages are in expediting the creation of multi-page documents with common elements, such as page numbers, headers, footers, and backgrounds. Putting common elements on a master page lets you alter those elements on all document pages with one change to the master. But what about those occasions when a document page requires something a little different, when a master page item needs to be altered in one instance only? That’s where it’s useful to override or detach the item from the master page.
If you’re a QuarkXPress super freak newly boogying to the InDesign beat, you’ll notice that you can’t just click to select master page items on document pages. Unlike XPress, InDesign locks master page items to prevent accidental repositioning and alteration. In other words: Ow! Can’t touch this! The difference in the way the two apps handle master page items can be frustrating at first, but rest assured, you can override those untouchable master page items.
To override (access) one master item at a time, CMD+SHIFT-click/CTRL+SHIFT-click on the master page item. It will unlock, override, and become a document page item. You’re then free to change it however you like. Overriding doesn’t completely disassociate the object from its master item original; rather, the object will continue to update with the master item except for your overrides. For instance, if you override a picture frame and apply a stroke to it on the document page, and then later go back and add a fill to the master page version, the fill will also apply to the document page item, but the stroke will remain on the document page item.
It might help to think of master items in InDesign the same way you think of text to which you’ve applied a paragraph style. If you’ve defined a paragraph style as Times New Roman and then manually make one word in a paragraph italic (creating a paragraph style override), it becomes Times New Roman italic. If you later change the paragraph style font family to Myriad Pro, the overridden attribute remains—the italic word stays italic but adopts the new font family attribute to become Myriad Pro italic.
There are some exceptions. For example, overriding a text frame breaks the content link—if you then type in the text frame on the master page, it won’t appear on the document page. And if you move the object on the document page, rotating it on the master page doesn’t affect what’s on the document page.
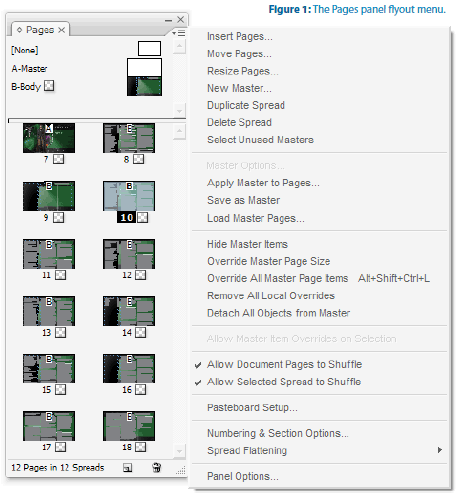
To override all master page items for the current page or spread, slide on up to the Pages panel flyout menu and select Override All Master Page Items (Figure 1). Now you’ve overridden and made accessible all objects applied by the master page. You can also CMD+SHIFT+drag over an area to override all the objects that the marquee rectangle touches.

To completely sever the connection between an overridden master item and its original on the master page, you must detach it. First, override the item as normal, and then, with the object(s) still selected, choose Detach Selection from Master from the Pages panel flyout menu. Once detached, the object will no longer inherit attributes from, nor change with, the original master page item.
You can also change your mind, dropping the overridden versions in favor of the original master page items. CMD+Z/CTRL+Z, of course, undoes override and detach operations, but only immediately after doing them. If you decide to remove overrides later, you can manually delete the overridden objects and reapply the master, which is the way most people do it, or you can opt to take the more efficient route.
On the Pages panel flyout menu is a dynamic menu command. If you select one or more objects that were once master page items, you’ll see the command to Remove Selected Overrides. Executing that command returns the selected objects to their untouchable, pre-override states, without affecting any other objects on the page—overridden master page items or objects created directly on the page.
If you want to restore all overridden master page items to their original, pre-override states, deselect all objects and return to the Pages panel flyout menu. The Remove Selected Overrides command will have transformed into the Remove All Local Overrides command.
Note that reapplying the master to that document page will result in two copies of the same objects—the overridden versions as well those still locked objects inherited from the master page.
You can apply a master page (or re-apply it) to a page by dragging the master page icons from the top of the Pages panel, dropping them onto document page icons in the lower portion. But, for the love of soul, don’t do it for more than a page or two!
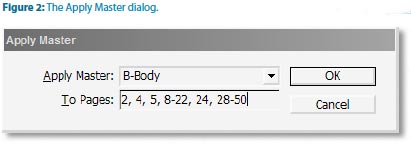
If you need to apply or re-apply a master page to more than a couple of pages, use the little known— but very funkalicious—Apply Master dialog (Figure 2). On the Pages panel flyout menu, choose the Apply Master to Pages command to open the Apply Master dialog. With only two fields it’s deceptively simple, but, like the best of funk music, simple lasts. From the dropdown Apply Master field, pick which master page to apply, and in the To Pages textbox, enter the page number(s) to which to apply or re�apply the chosen master. In this field you can enter a single page number, a range of pages separated by a hyphen (e.g., “2-50”), comma-delimited non�sequential page numbers (e.g., “2,4,6,8,10”), and even combinations of sequential and non-sequential pages (e.g., “2, 4, 5, 8-22, 24, 28-50”). This is a funk of a lot faster—and much less strain on your bop gun wrist—than dragging that master page icon numerous times.

Feel square and not so fresh using a dialog? Not a problem. You can apply or re-apply a master to multiple pages entirely from within the Pages panel. Select the needed pages. For a sequential range of pages, click on the first and then SHIFT-click on the last. To select multiple non-sequential pages, CMD-click/CTRL-click on the page icons. Once selected, OPT-click/ALT-click on the master page’s icon to apply it to all selected document pages.
Track 1 of “Play that Funky Master Page” is now concluded. In the next InDesign Magazine, I’ll spin up a whole new groove for you to get up, get down, and get funky with yo’ bad self. By the time I’ve finished discussing the tricks of working efficiently with master pages, you’ll be able to stand up and howl, I’ve got soul, and I’m super bad!

More on InDesign Magazine. Each issue gives you tips, techniques, and time-savers by an all-star cast of industry experts.


